Anyhow.
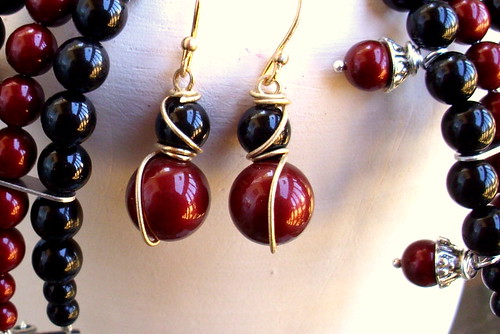
Free Handmade Jewelry Tutorial: How to Make Hand-Brushed Wire-Wrapped Earrings
suitable for bridal, formal or casual wear, with a subtle 14k brushed gold finish.
You will need:
- 8 inches (or so) 21g 14k gold-filled wire, dead soft
- 2 round 10mm beads
- 2 contrasting round 6mm beads
- 1 pair gold-filled earwires
- flush cutters
- round-nose pliers
- chain-nose pliers
- sanding block
-nylon-jawed pliers
The sanding block can be acquired inexpensively at your local hardware store. As for the rest, get the good stuff. Instructions after the jump.
- Turn the sanding block so the coarsest side is up. If desired, straighten the wire with nylon-jawed pliers; you won't want to straighten it again, because the jaws might buff the finish back to a shine.
- Sand the wire until a soft matte finish develops: Grasp the wire roughly 1.5 inches from the end and give the resulting inch length 2-4 passes over the sanding block, turn 90 degrees, and repeat. After sanding down all four "sides," advance the wire 1-2 inches and continue sanding in the same manner.
- Check wire for any remaining shiny spots and soften these as well.
- Cut the wire into two equal pieces and sand the cut ends.
- On the end of each of the two wires, form a wrapped loop: grasp the wire with your round-nosed pliers about a quarter inch from the end and smoothly turn it back on itself until it overlaps. Grasp the loop in a second pair of pliers (nylon-jawed if you have them) and use your chain-nose pliers to coax the wire into a tight spiral below the loop. Tuck the end tightly to the body of the wire with your chain-nose pliers.
- On each wire, string one 6mm bead and one 10mm bead. You should end up with a "snowman" shape with the wrapped loop at the top. Using your fingers, press the length of wire up at a 90 degree angle against the bottom of the larger bead.
- Pull the wire over the bead diagonally and slide it between the two beads.
- Make two or three wraps between the two beads. The wire should now form a tight arc over the bottom, larger bead. The wired side is the front.
- Continue in the direction of wrapping to form a similar diagonal wrap around the top, smaller bead.
- Finish by wrapping remaining wire tightly around the spiral below the wrapped loop at the top. When the wire grows too short to work comfortably with your fingers, switch to the chain-nose pliers. Trim the end and press it down flush to the wraps with chain-nose pliers.
- Repeat for the second earring, but this time make your wraps in the opposite direction; i.e., if you pulled the wire up and to the left on the first, pull it up and to the right on this one. Complete in the same manner.
- If there is any slack in your wire, shape it into more curved arcs with steady pressure of your fingers, bringing it tight against the beads. See the image above: apply gentle pressure at orange arrows while supporting with other fingers at the pink arrows to get that smooth curve. For me, it works best to grasp it in my "off" hand, place off fingers at the pink arrows, and press with my dominant hand's thumb at the orange arrow.
- Take your earwires and lightly sand the front, giving a brushed finish to visible parts. Leave the high part of the curves that inserts into the ears undisturbed.
- Open the loops of the earwires. Attach the wire-wrapped dangles with the majority of the wrapping toward the front. They should form near-mirror images. Close the loops.


No comments:
Post a Comment